P1 WebGL生态地图与核心API
WebGL enables web content to use an API based on OpenGL ES 2.0 to perform 3D rendering in an HTML <canvas in browsers that support it without the use of plug ins.
本文目录 11 个章节
WebGL enables web content to use an API based on OpenGL ES 2.0 to perform 3D rendering in an HTML <canvas> in browsers that support it without the use of plug-ins.
WebGL programs consist of control code written in JavaScript and special effects code (shader code) that is executed on a computer's Graphics Processing Unit (GPU).
WebGL elements can be mixed with other HTML elements and composited with other parts of the page or page background.
P1 WebGL生态地图与核心API
0 核心原理
状态机:
WebGL is really just an API to run shaders. The only functions that actually write pixels are gl.clear, gl.drawArrays and gl.drawElements. That's it! All other API calls just setup internal state for when those 3 functions are called.
顶点和片段Shader:
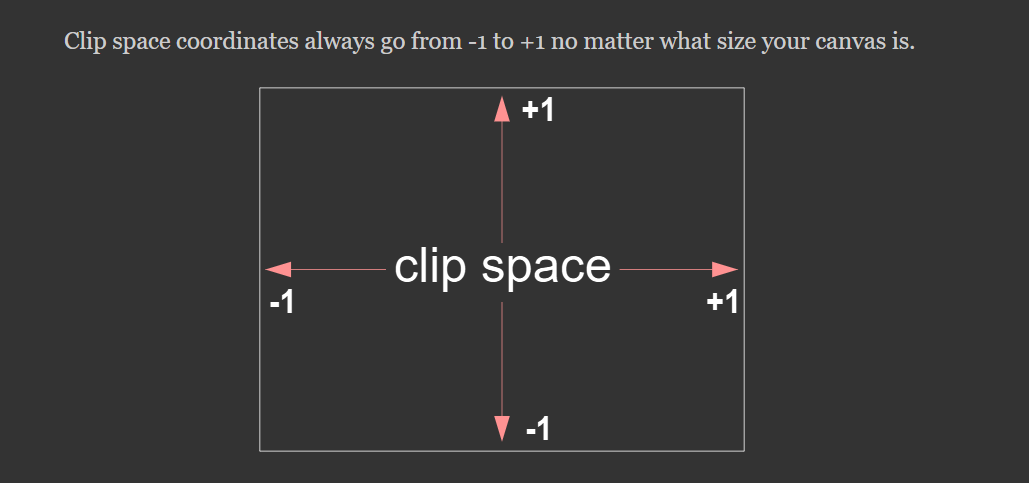
WebGL only cares about 2 things: clip space coordinates and colors. Your job as a programmer using WebGL is to provide WebGL with those 2 things. You provide your 2 "shaders" to do this. A Vertex shader which provides the clip space coordinates, and a fragment shader that provides the color.
1 浏览器‑GPU 渲染链
JS 源码 ─┐
          ↓  (1) JavaScript 解释/编译 (V8/SpiderMonkey…)
 **WebGL API 调用**  ──────────▶  (2) WebGL 驱动层
                                         │   把状态、顶点、uniform 等写入
                                         │   GPU Command Buffer
                                         ▼
                                  (3) GPU 驱动
                                         │   真正执行顶点 / 光栅 / 片元着色器
                                         ▼
                                  (4) 帧缓冲 → 屏幕
DOM 树 并不参与这条链;WebGL 只依赖
<canvas>提供的像素缓冲。调用链中能被你直接编写的只有:
- JavaScript 逻辑(WebGL API)
- GLSL 着色器(GPU 端程序)
2 WebGL 与 OpenGL ES 关系
WebGL 1.0 ≈ OpenGL ES 2.0(固定管线消失,全部靠顶点/片元着色器)。
WebGL 2.0 ≈ OpenGL ES 3.0,带来:
- VAO(Vertex Array Object)
- UBO(Uniform Buffer Object)
- Instanced Draws
- 多渲染目标(MRT)等高级特性。
判断浏览器支持:
const gl2 = canvas.getContext('webgl2'); // null ⇒ 只支持 WebGL1
3 GLSL ES 语法要点
| 关键字 | 作用 | WebGL1 vs WebGL2 |
|---|---|---|
attribute |
逐顶点输入 | 仅 WebGL1;在 WebGL2 用 in |
uniform |
所有顶点/片元共享参数 | 相同 |
varying |
顶点→片元插值 | WebGL1 用 varying,WebGL2 用 out/in |
precision mediump float; |
片元默认精度 | 片元着色器必须指定精度 |
GLSL 程序在运行前 编译 + 链接,否则 GPU 无法执行。(The Khronos Group)
4 四步搞定最小渲染
获取 WebGL Context
const gl = canvas.getContext('webgl');     // 或 'webgl2'
if (!gl) throw 'WebGL unsupported!';
编译着色器
const vs = gl.createShader(gl.VERTEX_SHADER);
gl.shaderSource(vs, vertexSource);
gl.compileShader(vs);
相同流程对片元着色器 (
gl.FRAGMENT_SHADER)。链接程序并激活
const prog = gl.createProgram();
gl.attachShader(prog, vs);  gl.attachShader(prog, fs);
gl.linkProgram(prog);  gl.useProgram(prog);
上传数据 + 绘制
const buf = gl.createBuffer();
gl.bindBuffer(gl.ARRAY_BUFFER, buf);
gl.bufferData(gl.ARRAY_BUFFER, new Float32Array([...]), gl.STATIC_DRAW);

const loc = gl.getAttribLocation(prog, 'aPos');
gl.enableVertexAttribArray(loc);
gl.vertexAttribPointer(loc, 2, gl.FLOAT, false, 0, 0);

gl.clearColor(0,0,0,1); gl.clear(gl.COLOR_BUFFER_BIT);
gl.drawArrays(gl.TRIANGLES, 0, 3);
详细代码见 §6。流程出自 MDN Getting Started with WebGL (MDN Web Docs)
5 环境配置 & 操作方法
- 编辑器:VS Code
- 本地服务器:安装扩展“Live Server”,右键 HTML → Open with Live Server(避免跨域和文件协议限制)。
- 浏览器:Chrome/Edge 最新版;开启 DevTools > Rendering > WebGL errors and warnings 选项可即时捕获 GL 报错。(Chrome for Developers)
6 三角形完整示例 + 行内注释
<meta charset="utf-8">
<canvas id="c" width="640" height="480"></canvas>
<script>
/// 1. 取 context ————————————————————————
const gl = document.getElementById('c').getContext('webgl');
if (!gl) { alert('WebGL unsupported'); throw 'no gl'; }

/// 2. 写 GLSL 源码 ————————————————————————
const vsSrc = `                 // 顶点着色器: 把顶点坐标直接送裁剪空间
attribute vec2 aPos;
void main() { gl_Position = vec4(aPos, 0.0, 1.0); }`;

const fsSrc = `                 // 片元着色器: 每个像素涂亮红色
precision mediump float;
void main() { gl_FragColor = vec4(1.0, 0.2, 0.2, 1.0); }`;

/// 3. 编译 & 链接 ————————————————————————
function compile(src,type){
  const s = gl.createShader(type);
  gl.shaderSource(s, src);  gl.compileShader(s);
  if(!gl.getShaderParameter(s, gl.COMPILE_STATUS))
      console.error(gl.getShaderInfoLog(s));
  return s;
}
const prog = gl.createProgram();
gl.attachShader(prog, compile(vsSrc, gl.VERTEX_SHADER));
gl.attachShader(prog, compile(fsSrc, gl.FRAGMENT_SHADER));
gl.linkProgram(prog); gl.useProgram(prog);

/// 4. 上传顶点 ————————————————————————
const buf = gl.createBuffer();
gl.bindBuffer(gl.ARRAY_BUFFER, buf);
gl.bufferData(gl.ARRAY_BUFFER,
  new Float32Array([ 0,0.8,  -0.8,-0.8,  0.8,-0.8 ]),
  gl.STATIC_DRAW);

const loc = gl.getAttribLocation(prog, 'aPos');
gl.enableVertexAttribArray(loc);
gl.vertexAttribPointer(loc, 2, gl.FLOAT, false, 0, 0);

/// 5. 清屏并绘制 ————————————————————————
gl.clearColor(0,0,0,1);       // 背景设黑
gl.clear(gl.COLOR_BUFFER_BIT); // 清颜色缓冲
gl.drawArrays(gl.TRIANGLES, 0, 3);
</script>
运行后看到红色三角即表示管线打通。
7 DevTools 调试要领
Sources ▶ WebGL
- Shaders 节点列出已编译 GLSL;点击可查看源码、uniform 值。
- Calls 面板统计本帧 WebGL API 调用数量。
Console
gl.getParameter(gl.VERSION);      // "WebGL 1.0 ..." or "WebGL 2.0 ..."
gl.getError();                    // 返回错误码 0 OK
Performance ▶ Frames
- 录制后展开一帧,可见 CPU script vs GPU raster 时间分布。
详见 Chrome DevTools Rendering & Performance 文档 (Chrome for Developers)
Reference
相关工具
JavaScript、HTML 和 CSS在线编辑、测试: https://jsfiddle.net/
three 学习引导GPT: https://chatgpt.com/g/g-jGjqAMvED-three-js-mentor/
调试
在 VS Code 中安装 Live Server 插件。
右键点击 index.html,选择 “Open with Live Server”。
VS Code 将在某个端口(默认 5500)启动本地服务器。