Python Qt
Python Qt QT: https://doc.qt.io/qt 6/portingguide.html QT: https://wiki.qt.io/Main https://wiki.qt.io/Qt for Python PySide6: https://doc.qt.io/qtforpython 6/quickstart.html
本文目录 31 个章节
Python Qt
QT: https://doc.qt.io/qt-6/portingguide.html QT: https://wiki.qt.io/Main https://wiki.qt.io/Qt_for_Python PySide6: https://doc.qt.io/qtforpython-6/quickstart.html
参考教程: 白月黑羽:https://www.byhy.net/tut/py/gui/qt_01/ 基于PySide6的GUI程序开发全流程:https://cloud.tencent.com/developer/article/2334289 (计算器程序示例)
简言之博主的博客:https://jwt1399.top/posts/41724.html#toc-heading-1
教程或示例资料
Code Editor Example:https://doc.qt.io/qtforpython-6.2/examples/example_widgets__codeeditor.html#:~:text=,codeeditor.py YoloSide: https://github.com/Jai-wei/YOLOv8-PySide6-GUI PySide代码式教程:https://github.com/muziing/PySide6-Code-Tutorial PySide2 入门教程:https://github.com/se7enXF/pyside2 PyQt各种测试和例子:https://github.com/PyQt5/PyQt PyQt-Fluent-Widgets:https://github.com/zhiyiYo/PyQt-Fluent-Widgets
Top 19 Python desktop-app Projects:https://www.libhunt.com/l/python/topic/desktop-app
- Qt-Material:PySide6、PySide2和PyQt5的 Material Design 风格样式表
- QDarkStyleSheet : 一个黑暗风格的样式表
- PyQt5_stylesheets :PyQt5 风格样式表
- CustomWidgets:PyQt Custom Widgets - PyQt 自定义控件
- PyQt Examples:PyQt各种测试和例子
- 3rd-Apps:Collecting 3rd App
来源: 简言之 文章作者: 简简 文章链接: https://jwt1399.top/posts/41724.html#toc-heading-171 本文章著作权归作者所有,任何形式的转载都请注明出处。
工具
QtAwesome https://github.com/spyder-ide/qtawesome PySide6-Code-Tutorial
https://github.com/5yutan5/PyQtDarkTheme https://github.com/KhamisiKibet/QT-PyQt-PySide-Custom-Widgets
参考项目
https://github.com/pyQode/pyQode https://github.com/TenderOwl/Frog/tree/master https://github.com/reflex-dev/reflex/tree/main
SpyderIDE(专为科学开发和数据分析设计的强大 Python IDE): https://github.com/spyder-ide/spyder OpenShot(多平台的视频编辑软件): https://github.com/OpenShot/openshot-qt Orange(基于组件的数据可视化和分析工具): https://github.com/biolab/orange3
https://github.com/CadQuery/CQ-editor https://github.com/gmarull/qtmodern https://github.com/Javacr/PyQt5-YOLOv5 https://github.com/Jai-wei/YOLOv8-PySide6-GUI https://github.com/Wanderson-Magalhaes/Modern_GUI_PyDracula_PySide6_or_PyQt6
开发环境与流程
配置虚拟环境
安装PySide6 (6.3.2)
配置 open qt designer菜单项
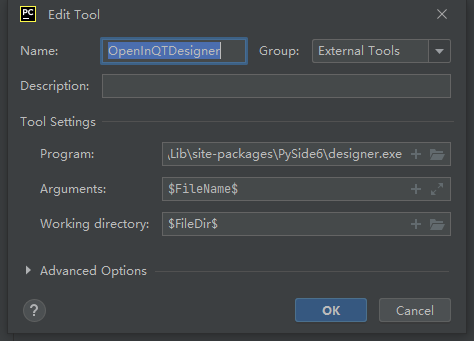
配置rcc与uic菜单项
Program -->D:\...\venv\Scripts\pyside6-uic.exe
Arguments --> $FileName$ -o $FileNameWithoutAllExtensions$.py
Program --> D:\...\venv\Scripts\pyside6-rcc.exe
Arguments --> $FileName$ -o $FileNameWithoutAllExtensions$_rc.py
- 打包exe
pip install pyinstaller
pip install auto-py-to-exe
auto-py-to-exe实际上是对pyinstaller的封装. 选择入口文件即可. pyinstall教程:https://www.byhy.net/tut/py/etc/toexe/
编程知识
框架特征
在 Qt 系统中,控件(widget)是 层层嵌套 的,除了最顶层的控件,其他的控件都有父控件。
编程规范
代码模块化: 通常应该把 一个窗口和其包含的控件,对应的代码 全部封装到类中.
接口用法
事件循环
事件循环 - 使应用程序能够响应用户的交互和系统事件,如鼠标点击、键盘输入、窗口关闭等。
QApplication的成员函数exec 用于启动 PyQt 应用程序的事件循环,并等待直到应用退出。
当界面上一个控件被操作时,就会发出 信号 ,英文叫 signal,表明一个事件(比如被点击、被输入文本)发生了。
处理 signal 的函数 叫做 slot
//把 button 被 点击(clicked) 的信号(signal), 连接(connect)到了 handleCalc 这样的一个 slot上
button.clicked.connect(handleCalc)
绘制相关
move决定这个控件相对于父窗口的左上角的位置
常用控件
菜单栏:
菜单栏(QMenuBar) -> 菜单(QMenu)-> 子菜单(QMenu) -> QAction
MDI 多个子窗口
树控件
界面布局
布局经验(via. 白月黑羽)
- 先不使用任何Layout,把所有控件 按位置 摆放在界面上
- 然后先从 最内层开始 进行控件的 Layout 设定
- 逐步拓展到外层 进行控件的 Layout设定
- 最后调整 layout中控件的大小比例, 优先使用 Layout的 layoutStrentch 属性来控制
多线程问题处理
Qt建议:
- 只在主线程中操作界面。在子线程操作界面可能会有意外问题,如输出显示不全,甚至程序崩溃。
- 使用信号处理子线程的事件。
信号在多线程问题中的使用:
自定义一个Qt 的 QObject类,里面封装一些自定义的 Signal信号。 一种信号定义为 该类的 一个 静态属性,值为Signal 实例对象即可。 Signal实例对象的初始化参数指定的类型,就是 发出信号对象时,传递的参数数据类型。 可以定义
多个Signal静态属性,对应这种类型的对象可以发出的多种信号。定义主线程执行的函数处理Signal信号(通过connect方法)
在新线程需要操作界面的时候,就通过自定义对象 发出 信号
主线程信号处理函数,被触发执行,获取Signal里面的参数,执行必要的更新界面操作。
from PySide6.QtWidgets import QApplication, QTextBrowser
from PySide6.QtUiTools import QUiLoader
from threading import Thread
import time
import sys

from PySide6.QtCore import Signal, QObject

class MySignals(QObject):
    text_print = Signal(str, str)
    update_table = Signal(str)

## 实例化
global_ms = MySignals()

class Stats:
    def __init__(self):
        self.ui = QUiLoader().load('ui/multi_thread.ui')
        self.ui.infoBox1.setText("初始文本\n")
        self.ui.infoBox2.setText("初始文本\n")
        global_ms.text_print.connect(self.printToGui)

    def printToGui(self, infoBoxName, text):
        infoBox = getattr(self.ui, infoBoxName)
        print("printToGui called: " + str(text))
        infoBox.append(str(text))
        infoBox.append(' --infobox-append--')
        infoBox.ensureCursorVisible()

    def task1(self):
        def threadFunc():
            time.sleep(2)
            # 通过Signal的emit触发执行主线程里面的处理函数
            print("线程1触发输出")
            global_ms.text_print.emit("infoBox1", '输出内容1')

        thread = Thread(target = threadFunc)
        thread.start()

    def task2(self):
        def threadFunc():
            time.sleep(4)
            print("线程2触发输出")
            global_ms.text_print.emit("infoBox2", '输出内容2')

        thread = Thread(target = threadFunc)
        thread.start()

app = QApplication()
sts = Stats()
sts.ui.show()
sts.task1()
sts.task2()
app.exec_()
QSS样式
QSS样式基本语法
文档:https://doc.qt.io/qt-5/stylesheet-syntax.html
更详细的笔记见: Python Qt QSS样式用法
选择器用于选择一个或多个需要应用样式的 Qt 部件
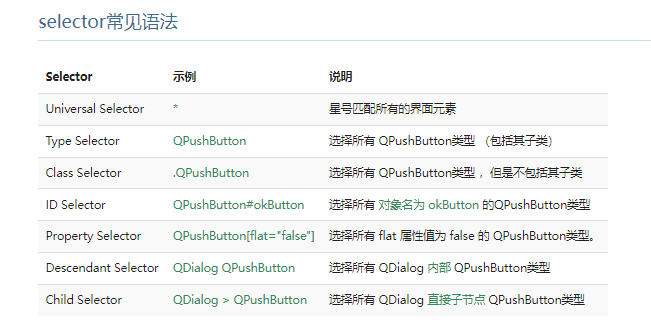
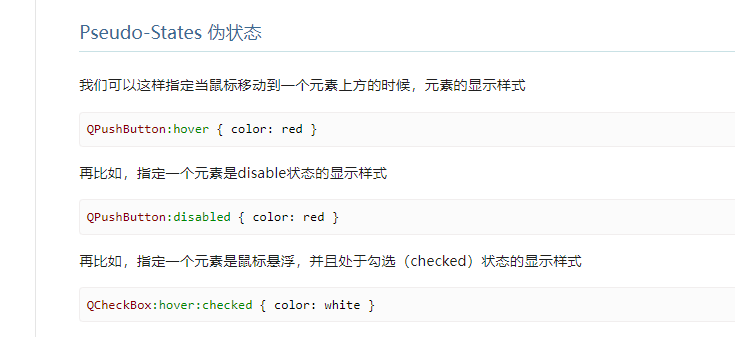
QTextEdit { background-color: yellow }
QTextEdit { background-color: #e7d8d8 }
QTextEdit { background-image: url(gg03.png); }
QTextEdit { margin:10px 11px 12px 13px }

/*
solid 实线 dashed 虚线 dotted 点
*/
*[myclass=bar2btn]:hover{ border:1px solid #1d649c; }

/*字体、大小、颜色*/
*{ font-family:微软雅黑; font-size:15px; color: #1d649c; }

QPushButton { width:50px; height:20px; }
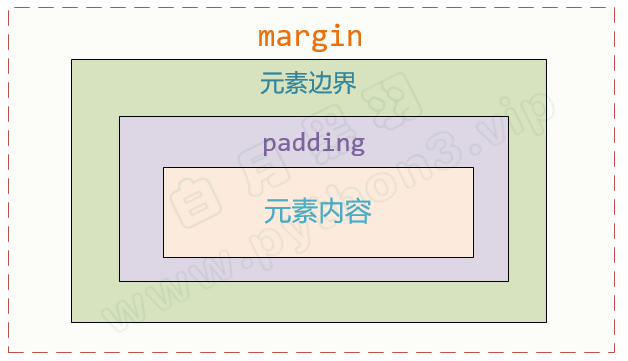 图片来源:https://www.byhy.net/tut/py/gui/qt_09/
QSS样式在工程中的用法与开发流程
组合方式
QApplication 引用.qss 文件
QSS选择器
app = QApplication(sys.argv)
form = QSSSelector()
## 选择器
#指定按钮
qssStyle = '''
	QPushButton[name="btn2"] {
		background-color:red;
		color:yellow;
		height:120;
		font-size:60px;
	}
	QPushButton[name="btn3"] {
		background-color:blue;
		color:yellow;
		height:60;
		font-size:30px;
	}
'''
form.setStyleSheet(qssStyle)
form.show()
sys.exit(app.exec_())
QSS子控件选择器
app = QApplication(sys.argv)
form = QSSSubControl()
'''
通过名字来引用,#myComboBox相当于web里通过id来引用
drop-down是下拉子控件
'''
qssStyle = '''
   QComboBox#myComboBox::drop-down {
	   image:url(../picture/icon/first.png)
   }
'''
form.setStyleSheet(qssStyle)
form.show()
sys.exit(app.exec_())
结合Python数据可视化
Matplotlib
import sys
from PySide6.QtWidgets import QApplication, QVBoxLayout, QMainWindow, QWidget
from matplotlib.backends.backend_qtagg import FigureCanvasQTAgg as FigureCanvas
from matplotlib.figure import Figure
import numpy as np

class MplWidget(QWidget):
    def __init__(self, parent=None):
        super(MplWidget, self).__init__(parent)

        # 创建一个新的图标Figure
        # 创建一个Matplotlib图标的画布FigureCanvas。  FigureCanvas是将这个图表转换为可以在PySide6中显示的小部件
        self.canvas = FigureCanvas(Figure())

        vertical_layout = QVBoxLayout()
        vertical_layout.addWidget(self.canvas)

        # 在画布上创建一个1x1网格的第1个子图
        self.canvas.axes = self.canvas.figure.add_subplot(111)
        self.setLayout(vertical_layout)

class MainWindow(QMainWindow):
    def __init__(self):
        super().__init__()

        self.central_widget = QWidget()
        self.setCentralWidget(self.central_widget)
        layout = QVBoxLayout(self.central_widget)

        self.mpl_widget = MplWidget(self.central_widget)
        layout.addWidget(self.mpl_widget)

        self.plot()

    def plot(self):
        mu, sigma = 100, 15
        print( str(np.random.randn(10000)))
        x = mu + sigma * np.random.randn(10000)
        self.mpl_widget.canvas.axes.clear()

        # x: 这是直方图将要展示的数据集。在这个例子中,x应该是一个包含数据点的数组或列表。
        # 50: 表示直方图的条形(bins)的数量。在这个例子中,数据将被分成50个条形来展示。
        # density=1: 当设置为1时,表示直方图的纵轴将显示密度而不是计数。这意味着直方图下的总面积(或总高度)等于1。
        self.mpl_widget.canvas.axes.hist(x, 50, density=1, facecolor='g', alpha=0.75)
        self.mpl_widget.canvas.axes.set_xlabel('Smarts') # X轴标签
        self.mpl_widget.canvas.axes.set_ylabel('Probability')
        self.mpl_widget.canvas.axes.set_title('Histogram of IQ') # 标题
        self.mpl_widget.canvas.axes.text(60, .025, r'$\mu=100,\ \sigma=15$') # 在指定位置添加文本
        self.mpl_widget.canvas.axes.axis([40, 160, 0, 0.03]) # 设置坐标轴范围
        self.mpl_widget.canvas.axes.grid(True) # 显示网格
        self.mpl_widget.canvas.draw() # 更新画布上的绘图,这样更改才会显示在GUI上。

app = QApplication(sys.argv)
main = MainWindow()
main.show()
sys.exit(app.exec_())
PyQtGraph
优点: 大数据量的作图性能高于 Matplotlib, 动态更新图的性能也比Matplotlib高。并且和Qt图形界面框架完美融合。 缺点: 作图功能没有Matplotlib多,开发社区没有Matplotlib大。
工程架构
需要将代码进行模块化,使其易于维护和扩展,有两种方案:
(1)将所有UI绘制在一个main_window.ui文件中(将不同部分分发给不同的类)
优点:UI设计集中,易于统一管理和调整。
缺点:代码中分发逻辑可能变得复杂。
- 定义接口或回调:在主窗口类中定义接口或回调函数,以便不同的部分可以与主窗口通信。
- 创建子组件类:为UI中的每个独立部分创建单独的Python类。
- 在主窗口类中实例化:在加载了
main_window.ui之后,根据UI中的不同部分实例化相应的子组件类,并将相关UI元素传递给它们。
class PartA:
    def __init__(self, ui_component):
        self.ui_component = ui_component
        # 初始化PartA

class MainWindow:
    def __init__(self):
        self.ui = load_ui('main_window.ui')
        self.part_a = PartA(self.ui.someComponent)
(2)多个UI文件(每个部分一个UI文件):
- 优点:模块化程度高,易于维护和扩展。
- 缺点:需要更多的文件组织和管理。
对于较大、复杂的项目,第一种方案可能更优;而对于小型或中等规模的项目,第二种方案可能更为合适。
模块拆解合并工作流
在一个UI文件当中绘制。
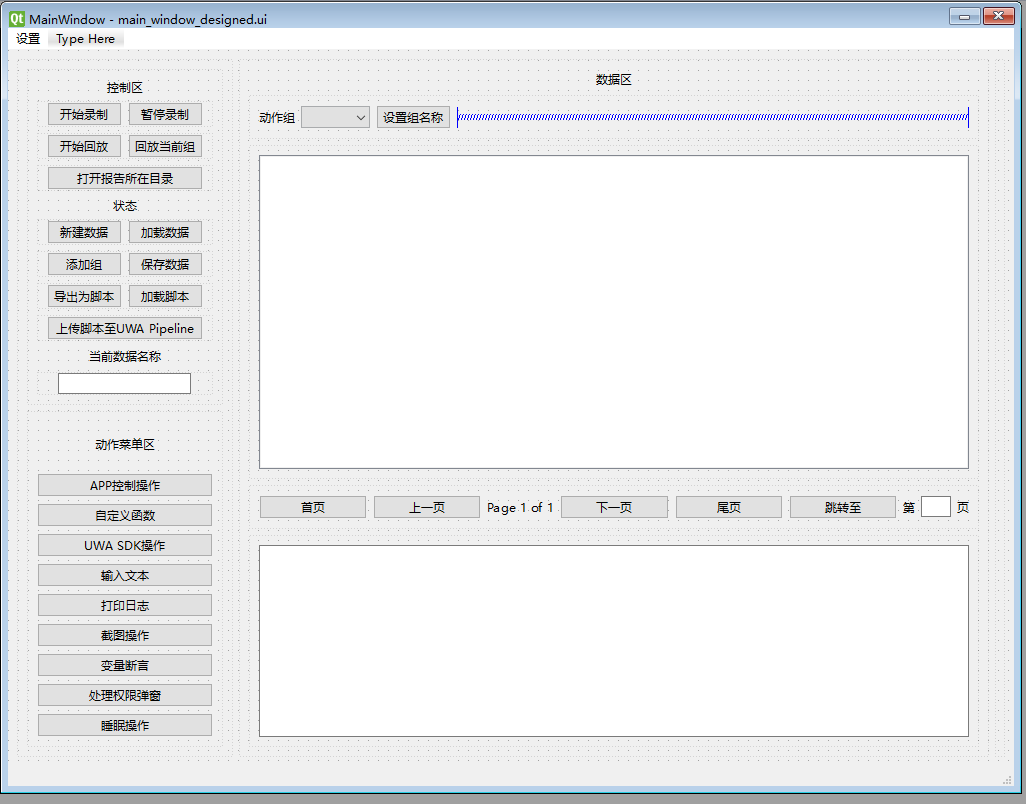
绘制好后,可将各个部分拆到不同的UI文件当中。
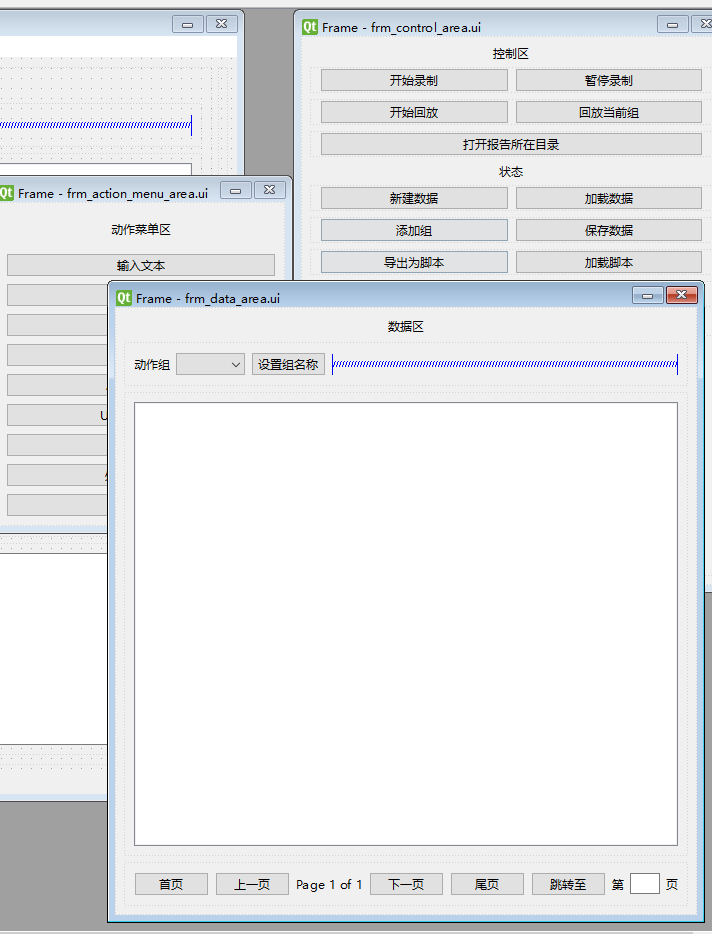
每个UI文件编写对应的类,在运行时对UI进行初始化。
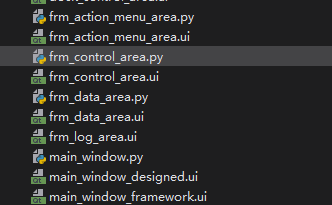
类中的代码如下:
from PySide6.QtUiTools import QUiLoader

class ControlArea():
    def __init__(self):
        super(ControlArea, self).__init__()
        loader = QUiLoader()
        self.ui = loader.load("ui/frm_control_area.ui")
用一个.ui文件和.py文件作为主窗口的布局和总体的管理:
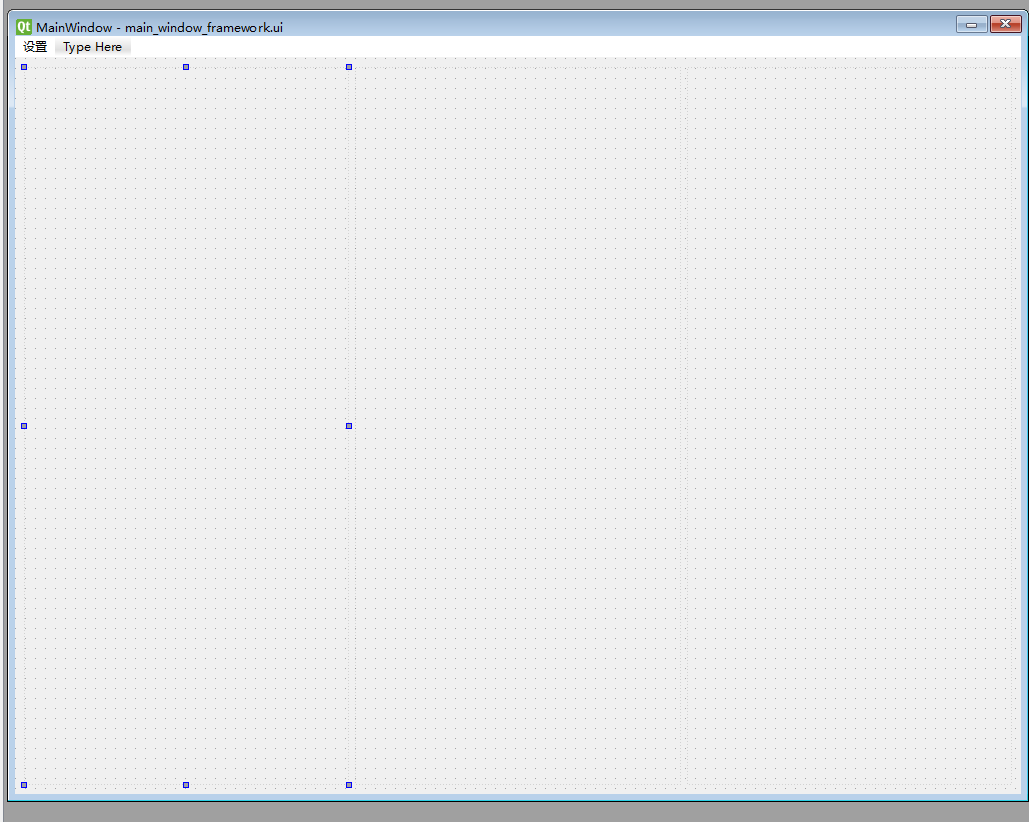 在MainWindow类中逐个对子模块进行实例化和绑定。
class MainWindow(QObject):
    def __init__(self):
        QObject.__init__(self)
        print("init main window")
        self.ui = QUiLoader().load('ui/main_window_framework.ui')
        print("load main window ui done")
        ## PRINT ==> SYSTEM
        print('System: ' + platform.system())
        print('Version: ' +platform.release())

        # 实例化子部分
        self.actionMenuArea = ActionMenuArea()
        self.controlArea = ControlArea()
        self.dataArea = DataArea()

        # 将子部分添加到主窗口
        self.ui.frmLeft.layout().addWidget(self.controlArea.ui)
        self.ui.frmLeft.layout().addWidget(self.actionMenuArea.ui)
        self.ui.frmMiddle.layout().addWidget(self.dataArea.ui)
单例模式用法
from functools import wraps

def Singleton(orig_cls):
    orig_new = orig_cls.__new__
    instance = None

    @wraps(orig_cls.__new__)
    def __new__(cls, *args, **kwargs):
        nonlocal instance
        if instance is None:
            instance = orig_new(cls, *args, **kwargs)
        return instance
    orig_cls.__new__ = __new__
    return orig_cls
## import common utils
from utils.common_utils import *

@Singleton
class Recorder:
    def __init__(self):
        self.isRecording = False

    def Start(self):
        pass

    def Stop(self):
        pass


## 使用
obj1 = Recorder()
obj2 = Recorder()
## obj1 和 obj2 是相同的实例
print(obj1 is obj2) # 输出 True
注意事项
- 确保单例的创建和使用不会导致循环依赖。
- 在单例类中,避免在
__init__方法中编写复杂的初始化逻辑,因为它只会在第一次实例化时执行。 - 考虑线程安全问题,尤其是在多线程环境中使用单例。
循环引用问题处理
循环引用:两个或多个模块相互导入对方,导致Python无法正确初始化这些模块。
解决方案:
- 重新组织代码结构:调整代码结构,避免模块间的直接循环依赖。
- 将相关的函数或类重构到一个新的模块中
- 创建一个新的模块作为共同依赖。
- 通过使用观察者模式、信号槽机制或回调函数来减少模块间的直接依赖。
使用
import而不是from ... import ...。延迟导入:在函数或方法内部进行导入,而不是在模块顶部。这种“延迟导入”可以避免初始化时的循环依赖问题。
def my_function():
    from data.action_data_manager import ActionDataManager
    # 使用 ActionDataManager
from import和import
from ... import ...
- 导入特定对象:使用
from module import name语句可以直接从模块中导入一个或多个特定的对象(如函数、类或变量)。 - 名称空间:导入的对象直接进入当前名称空间,无需使用模块名称作为前缀。
- 循环引用问题:如果两个模块互相
from ... import ...对方,Python在导入过程中需要立即解析这些对象。如果被导入的对象尚未定义(因为相互依赖尚未解决),就会导致错误。
import ...
- 导入整个模块:使用
import module语句会导入整个模块。 - 名称空间:必须通过模块名称来访问模块内的对象,例如
module.name。 - 循环引用问题:
import在处理循环引用时通常更为宽容。这是因为import语句导入模块本身,而不是其中的特定对象。当Python执行import语句时,它只是加载模块并使其可用,而不需要立即解析模块内的所有内容。因此,即使存在循环引用,只要避免在模块级别执行依赖于彼此的代码,通常不会出现问题。
UI和Data模块互相引用的解决方案
- 使用事件或信号槽机制(QT框架原生做法) 这是避免循环依赖的一种优雅方式。
class ActionDataManager:
    data_changed = Signal()  # 使用适当的信号库

    def addActionItem(self, action):
        self.actions.append(action)
        self.data_changed.emit()  # 触发信号
class DataArea(QWidget):
    def __init__(self, data_manager):
        super(DataArea, self).__init__()
        data_manager.data_changed.connect(self.updateUI)

    def updateUI(self):
        actions = ActionDataManager().getActions()
        # 更新UI逻辑
- 使用回调函数
class ActionDataManager:
    def __init__(self):
        self.on_data_changed = None

    def addActionItem(self, action):
        self.actions.append(action)
        if self.on_data_changed:
            self.on_data_changed()
class DataArea(QWidget):
    def __init__(self, data_manager):
        super(DataArea, self).__init__()
        data_manager.on_data_changed = self.updateUI
踩坑集
Q:QUiLoader.load ui文件时,报错栈溢出: Process finished with exit code -1073740791 (0xC0000409) A: 需要先实例化QApplication([]),再加载UI文件。
Q: QUiLoader().load的方式加载UI,使用Pycharm编写代码的时候,会出现编辑器报Cannot find reference或者Unresolved attribute reference的情况,如何解决?
感谢
ref: https://www.byhy.net/tut/py/gui/qt_02/ ref: https://blog.51cto.com/u_12072082/5569244 ref: https://blog.csdn.net/weixin_44593822/article/details/113834208 https://qtdebug.com/qtbook-qss-selector/ https://jwt1399.top/posts/41724.html#toc-heading-171